
In the last article, we have learned about linux network namespace (https://aiinfrahub.com/linux-network-namespace/), Also, we understood that there is a serious scalability issue when connecting namespaces. As the no of namespaces increases we will face tremendous challenge in creating veth pair and connecting the namespaces.
Rescue is done by Linux bridge which can tap these network namespaces to the bridge to get connectivity. The same concept applied to the Docker where it sets up networking between containers running on the same host.
What is Linux network bridge ?
A bridge works at Layer 2 of OSI model ie data link layer and it functions similar to a network switch. It allows multiple network interfaces to communicate with each other based on MAC addresses, which is essential for virtual networking, required for environments using containers or virtual machines.
Demo
We will demo the linux bridge in a single system whose hostname is “host1”. Below is setup diagram which we will create using commands.
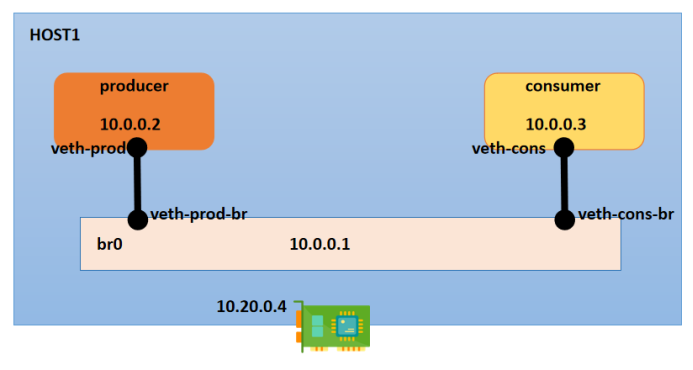
# Define some macros for host1
NS1="NS1"
NS2="NS2"
BRIDGE_SUBNET="10.0.0.0/24"
BRIDGE_IP="10.0.0.1"
IP1="10.0.0.2"
IP2="10.0.0.3"- Create the namespaces
# Create the namespaces
sudo ip netns add $NS1
sudo ip netns add $NS2
host1$ ip netns show
NS1
NS2- Create the veth pairs
# Create the veth pairs
host1$sudo ip link add vethNS1 type veth peer name vethNS1-br
host1$sudo ip link add vethNS2 type veth peer name vethNS2-br
host1$ip link show | grep veth
22: vethNS1-br@vethNS1: <BROADCAST,MULTICAST,M-DOWN> mtu 1500 qdisc noop state DOWN mode DEFAULT group default qlen 1000
23: vethNS1@vethNS1-br: <BROADCAST,MULTICAST,M-DOWN> mtu 1500 qdisc noop state DOWN mode DEFAULT group default qlen 1000
24: vethNS2-br@vethNS2: <BROADCAST,MULTICAST,M-DOWN> mtu 1500 qdisc noop state DOWN mode DEFAULT group default qlen 1000
25: vethNS2@vethNS2-br: <BROADCAST,MULTICAST,M-DOWN> mtu 1500 qdisc noop state DOWN mode DEFAULT group default qlen 1000- Add the veth pairs to the namespaces
# Adding the veth pairs to the namespaces
host1$sudo ip link set vethNS1 netns $NS1
host1$sudo ip link set vethNS2 netns $NS2
host1$sudo ip netns exec NS1 ip addr
1: lo: <LOOPBACK> mtu 65536 qdisc noop state DOWN group default qlen 1000
    link/loopback 00:00:00:00:00:00 brd 00:00:00:00:00:00
23: vethNS1@if22: <BROADCAST,MULTICAST> mtu 1500 qdisc noop state DOWN group default qlen 1000
link/ether 9a:ab:15:34:22:f1 brd ff:ff:ff:ff:ff:ff link-netnsid 0- Configure the veth interfaces in the network namespace with ip address
# Configure the veth interfaces in the network namespace with ip address

host1$sudo ip netns exec $NS1 ip addr add $IP1/24 dev vethNS1

host1$sudo ip netns exec $NS2 ip addr add $IP2/24 dev vethNS2

host1$sudo ip netns exec NS1 ip addr

1: lo: <LOOPBACK> mtu 65536 qdisc noop state DOWN group default qlen 1000

    link/loopback 00:00:00:00:00:00 brd 00:00:00:00:00:00

23: vethNS1@if22: <BROADCAST,MULTICAST> mtu 1500 qdisc noop state DOWN group default qlen 1000

    link/ether 9a:ab:15:34:22:f1 brd ff:ff:ff:ff:ff:ff link-netnsid 0

    inet 10.0.0.2/24 scope global vethNS1

valid_lft forever preferred_lft forever- Enable the interfaces in the network namespace to get the IP’s
# Enable the interfaces in the network namespace
host1$sudo ip netns exec $NS1 ip link set dev vethNS1 up
host1$sudo ip netns exec $NS2 ip link set dev vethNS2 up
host1$sudo ip netns exec NS1 ip addr
1: lo: <LOOPBACK> mtu 65536 qdisc noop state DOWN group default qlen 1000
    link/loopback 00:00:00:00:00:00 brd 00:00:00:00:00:00
23: vethNS1@if22: <NO-CARRIER,BROADCAST,MULTICAST,UP> mtu 1500 qdisc noqueue state LOWERLAYERDOWN group default qlen 1000
    link/ether 9a:ab:15:34:22:f1 brd ff:ff:ff:ff:ff:ff link-netnsid 0
    inet 10.0.0.2/24 scope global vethNS1
       valid_lft forever preferred_lft forever
Here, you can observe that the state is “LOWERLAYERDOWN”, its because the other end veth is yet not connected, once we connect it to bridge the state will be “UP”.
- Create the bridge
# Create the bridge
host1$sudo ip link add br0 type bridge
host1$ip link show type bridge
26: br0: <BROADCAST,MULTICAST> mtu 1500 qdisc noop state DOWN mode DEFAULT group default qlen 1000
link/ether 16:d3:08:5d:a7:55 brd ff:ff:ff:ff:ff:ff- Add the network namespaces interfaces to the bridge
- Assign IP address to the bridge
- Enable the bridge
# Adding the network namespaces interfaces to the bridge
host1$sudo ip link set dev vethNS1-br master br0
host1$sudo ip link set dev vethNS2-br master br0

# Assign IP address to the bridge
host1$sudo ip addr add $BRIDGE_IP/24 dev br0

# Enable the bridge
host1$sudo ip link set dev br0 up- Enable the interfaces connected to the bridge
# Enable the interfaces connected to the bridge"
host1$sudo ip link set dev vethNS1-br up
host1$sudo ip link set dev vethNS2-br up
host1$sudo ip netns exec NS1 ip addr
1: lo: <LOOPBACK> mtu 65536 qdisc noop state DOWN group default qlen 1000
    link/loopback 00:00:00:00:00:00 brd 00:00:00:00:00:00
23: vethNS1@if22: <BROADCAST,MULTICAST,UP,LOWER_UP> mtu 1500 qdisc noqueue state UP group default qlen 1000
    link/ether 9a:ab:15:34:22:f1 brd ff:ff:ff:ff:ff:ff link-netnsid 0
    inet 10.0.0.2/24 scope global vethNS1
       valid_lft forever preferred_lft forever
    inet6 fe80::98ab:15ff:fe34:22f1/64 scope link
       valid_lft forever preferred_lft forever
PING Test
- Verify the two network namespaces are connected and are reachable with the same host
host1$sudo ip netns exec NS1 ping 10.0.0.3 -c 2
PING 10.0.0.3 (10.0.0.3) 56(84) bytes of data.
64 bytes from 10.0.0.3: icmp_seq=1 ttl=64 time=0.154 ms
64 bytes from 10.0.0.3: icmp_seq=2 ttl=64 time=0.056 ms- Verify the network namespaces can ping itself
Example, we will try to ping NS2’s ip from NS2 namespace
host1$sudo ip netns exec NS2 ping 10.0.0.3 -c 2
PING 10.0.0.3 (10.0.0.3) 56(84) bytes of data.

--- 10.0.0.3 ping statistics ---
2 packets transmitted, 0 received, 100% packet loss, time 1028ms
We see that its 100% packet loss, its happening because we don’t have loopback interface. Enabled. Lets enable the loopback interface and see if its self pinging.
#Setting the loopback interfaces in the network namespaces
host1$sudo ip netns exec $NS1 ip link set lo up
host1$sudo ip netns exec $NS2 ip link set lo up

host1$sudo ip netns exec NS2 ping 10.0.0.3 -c 2
PING 10.0.0.3 (10.0.0.3) 56(84) bytes of data.
64 bytes from 10.0.0.3: icmp_seq=1 ttl=64 time=0.026 ms
64 bytes from 10.0.0.3: icmp_seq=2 ttl=64 time=0.103 ms

--- 10.0.0.3 ping statistics ---
2 packets transmitted, 2 received, 0% packet loss, time 1065ms
rtt min/avg/max/mdev = 0.026/0.064/0.103/0.038 ms- Verify the network namespaces connectivity with the host IP
host1$sudo ip netns exec NS2 ping 10.20.2.4 -c 2
ping: connect: Network is unreachable
‘Network is unreachable’ , this behaviour is expected because there is no route configured in the newly created namespaces. Lets set the default route in the network namespace
# Setting the default route in the network namespace
host1$sudo ip netns exec $NS1 ip route add default via $BRIDGE_IP dev vethNS1
host1$sudo ip netns exec $NS2 ip route add default via $BRIDGE_IP dev vethNS2

host1$sudo ip netns exec NS2 ping 10.20.2.4 -c 2
PING 10.20.2.4 (10.20.2.4) 56(84) bytes of data.
64 bytes from 10.20.2.4: icmp_seq=1 ttl=64 time=0.167 ms
64 bytes from 10.20.2.4: icmp_seq=2 ttl=64 time=0.108 ms

--- 10.20.2.4 ping statistics ---
2 packets transmitted, 2 received, 0% packet loss, time 1056ms
rtt min/avg/max/mdev = 0.108/0.137/0.167/0.029 ms- Verify the two network namespaces on two different hosts are connected and are reachable.
Basically, we want to ping from HOST1->NS1 to HOST2->NS1
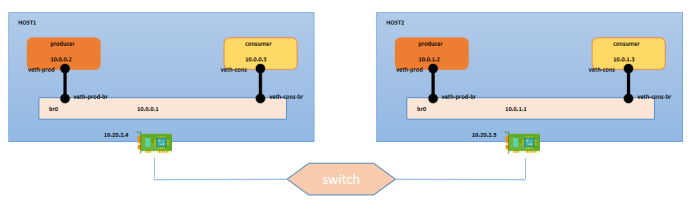
We will be following same steps in HOST2 similar to HOST1.
NS1="NS1"
NS2="NS2"
BRIDGE_SUBNET="10.0.0.0/24"
BRIDGE_IP="10.0.1.1"
IP1="10.0.1.2"
IP2="10.0.1.3"

sudo ip netns add $NS1
sudo ip netns add $NS2

sudo ip link add vethNS1 type veth peer name vethNS1-br
sudo ip link add vethNS2 type veth peer name vethNS2-br

sudo ip link set vethNS1 netns $NS1
sudo ip link set vethNS2 netns $NS2

sudo ip netns exec $NS1 ip addr add $IP1/24 dev vethNS1
sudo ip netns exec $NS2 ip addr add $IP2/24 dev vethNS2

sudo ip netns exec $NS1 ip link set dev vethNS1 up
sudo ip netns exec $NS2 ip link set dev vethNS2 up

sudo ip link add br0 type bridge
sudo ip link set dev vethNS1-br master br0
sudo ip link set dev vethNS2-br master br0

sudo ip addr add $BRIDGE_IP/24 dev br0

sudo ip link set dev br0 up

sudo ip link set dev vethNS1-br up
sudo ip link set dev vethNS2-br up

sudo ip netns exec $NS1 ip route add default via $BRIDGE_IP dev vethNS1
Lets ping from HOST1->NS1 to HOST2->NS1
host1$sudo ip netns exec NS1 ping 10.0.1.2 -c 2
PING 10.0.1.2 (10.0.1.2) 56(84) bytes of data.

--- 10.0.1.2 ping statistics ---
2 packets transmitted, 0 received, 100% packet loss, time 1061ms
We can see that there is 100 % packet loss. We need route on HOST1 to reach the network namespace of HOST2. Also we have enable IP forwarding on each node.
HOST1:
host1$#sudo ip route add 10.0.1.0/24 via 10.20.2.5 dev enp0s3
host1$#sudo sysctl -w net.ipv4.ip_forward=1
HOST2:
host2$#sudo ip route add 10.0.0.0/24 via 10.20.2.4 dev enp0s3
host2$#sudo sysctl -w net.ipv4.ip_forward=1
PING test:
host1$sudo ip netns exec NS1 ping 10.0.1.2 -c 2
PING 10.0.1.2 (10.0.1.2) 56(84) bytes of data.
64 bytes from 10.0.1.2: icmp_seq=1 ttl=62 time=0.596 ms
64 bytes from 10.0.1.2: icmp_seq=2 ttl=62 time=0.976 ms

--- 10.0.1.2 ping statistics ---
2 packets transmitted, 2 received, 0% packet loss, time 1036ms
rtt min/avg/max/mdev = 0.596/0.786/0.976/0.190 ms
Conclusion
Here, we have reached the end of our linux network bridge demo.We have covered basic connectivity between network namespaces using linux bridges. Also, all the scenarios were based on network resources residing in same subnet. When communication between network constructs is within same subnet then docker or Kubernetes uses native routing.
However, when nodes and interfaces belong to different subnets, the concept of overlay networks comes into picture.
An overlay network is a virtual network that sits on top of an existing network infrastructure. It allows devices in different subnets or even different physical locations to communicate as if they were on the same Layer 2 or Layer 3 network.
In Kubernetes, all modern day CNI (Container Network Interface) plugin implement overlay networks to ensure seamless communication across different nodes residing on different subnet.
We will go over the Container Network Interface in the next chapter.
Good Bye for now.
References
https://man7.org/linux/man-pages/man8/bridge.8.html
https://en.wikipedia.org/wiki/Network_bridge
Author Profile

- AI | Amplifying Impact
- Talks about AI | GenAI | Machine Learning | Cloud | Kubernetes
Latest entries
 AgenticAIAugust 12, 2025Pipeline Companion – an AWS Strands Agent for Data Pipeline Monitoring
 AgenticAIAugust 7, 2025AWS Strand Agent – integration with Researcher MCP server
 AgenticAIAugust 5, 2025Building an MCP Server Using FastMCP and arXiv
 AgenticAIAugust 3, 2025Building a Resume Question-Answering System Using LlamaIndex, OpenAI, and LlamaParse